The right material in the right place is crucial for the quality, durability and weight of an end product, and ultimately for its success. All over the world, Optomet laser Doppler vibrometers are making important contributions to the systematic search for new insights in the field of materials research. Whether it is the determination of material parameters or non-destructive testing/non-destructive inspection (NDT or NDI), contactless measurement methods are of particular importance here, as they do not influence the material characteristics and, compared to contact-based measurement methods, such as those using an accelerometer, enable unadulterated material testing.
Non-destructive and non-contact materials research
Non-destructive testing of materials (NDT)
Fiber-reinforced composites are becoming increasingly important in component manufacturing in order to reduce weight and achieve high specific stiffness. Examples are the production of aircraft wings in aviation or car body parts in the automotive industry. Delamination or cracks must be localized in time during production or during maintenance checks to avoid premature material fatigue. When thin-walled fiber composite plates are excited at high frequency, for example by piezoelectric elements, Lamb waves (short-wave surface waves) are generated, among other things. These interact with imperfections in the material, causing inhomogeneities in the wave propagation or local resonances (local defect resonance - LDR).
Laser Doppler vibrometers of the Optomet Scan series can detect the in-phase propagation of the waves at each measuring point on the material surface and thus visualize defects in the material that are not visible to the naked eye. The internal signal generator can create any signal shapes that can be used to excite the components, such as pulses or frequency sweeps. The OptoSCAN software is used to carry out the entire measurement process, from setting up the measurement channels and defining the measurement points to visualizing and analyzing the measurement data in the frequency and time domains. With the help of the export function, the data can be exported in standard formats, such as UFF, HDF5 and mat-files (MATLAB), and thus further processed.
Practical example
Using the Optomet Scanning Vibrometer, defects introduced on the back of a CFRP plate are detected. The internal signal generator produces a square-wave pulse to excite a piezo actuator attached to the CFRP plate. The waves propagating from the piezo element (bottom center) interact with the two defects, making them visible in the time and frequency domains due to locally higher amplitudes (local defect resonances).

Split Hopkinson Bar (SHPB)
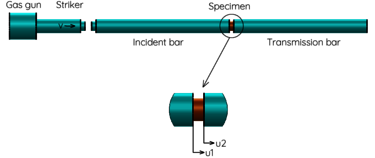
A split Hopkinson bar test is a method for material testing used to determine material properties under dynamic conditions. The test specimen (e.g. a concrete cylinder or a composite material) is placed between two bars, the incident bar and the transmission bar. An accelerated striker hits the incident bar and causes an impact pulse. The resulting wave passes through the first bar and then hits the material sample, which is also passed through by the wave, which in turn passes it on to the second bar (transmission bar).
Optomet's Laser Doppler Vibrometers (LDV) are the perfect measurement tool for measuring the temporal course of these highly dynamic shock pulses, thanks to their high sampling rate of 160 MSamples/s and a dynamic range of over 220 dB.
Split Hopkinson Bar (SHPB) in detail


 SMART Scan+
 SMART 3D-Scan
 SMART Full Body
 SMART Single+
 SMART Multi-Fiber
 SMART 3D-Fiber
 SMART DAQ
 Software SMART Lab
 Scanning Vibrometer
 Vector-Series
 Vector-Micro-Optics
 Nova-Series
 Nova-Xtra
 Fiber-Series
 Fiber-Multiplex
 Fiber Micro Manipulator
 OptoSCAN
 OptoGUI
 Acoustics & Ultrasonics
 Aerospace and aviation
 Automotive
 Biology & Medicine
 Brake noise
 Civil Engineering
 Electronics & Household Devices
 Materials Research
 Medical technology
 Tools & Machinery
 Turbine
 Wind tunnel testing


